Step I: Enable IMAP in Google Settings
1. Log into G-mail via a browser
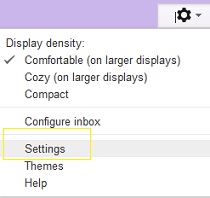
2. In the upper right corner, click the gear/settings icon 
3. From the drop-down menu, choose “settings”
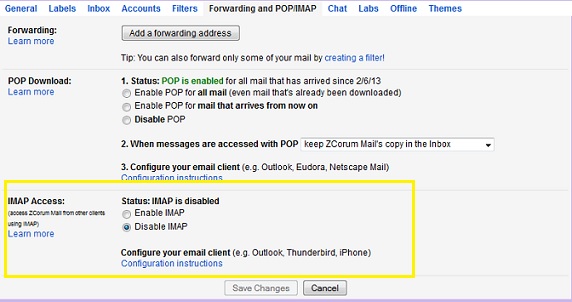
4. On the settings screen, locate the section labeled ” Forwarding and POP/IMAP” (found across the top)

5. When the screen appears, locate “IMAP Access” and place a dot next to “Enable IMAP”
6. Click “Save Settings”
Step II: Identify IMAP Configuration Settings
To start you must first ensure you have the correct IMAP settings. When configuring the mail client, customer must enter the IMAP settings as provided.
Configuration Settings
INCOMING MAIL SETTINGS
Incoming mail: mail.monroeaccess.net
Incoming Port #: 143
Requires SSL: No
Username: Full email address
Authentication: Password (if applicable)
********************************************************************
OUTGOING MAIL SETTINGS
Outgoing mail server: mail.monroeaccess.net
Outgoing Port # : 587
Requires SSL: No
Username: Full email address
Authentication: Password (if applicable)
Step III: Configure Email Client
- Mac Mail
1. Open Mac Mail. If this is the first time that it has been used, the Setup Assistant will appear. Otherwise, select File / Add Account.
**Note: If your operating system is Tiger, click the Continue button, and select IMAP from the Account Type drop-down menu.
2. Enter the following information:
Full Name—Enter your first and last name. This is the name that will appear in the From field of messages you send.
-
Email Address—Enter your entire email address (e.g., myname@monroeaccess.net)
-
Password—Enter the password for your email account.
3. Click the Continue button and Enter the following information:
-
Account Type—Select IMAP from the drop-down menu.
-
Description—Enter a name of your ISP. (e.g: monroeaccess.net)
-
Incoming Mail Server—mail.monroeaccess.net
User Name—Enter your entire email address (e.g., myname@monroeaccess.net).
-
Password—Enter the password for this account.
4. Click the Continue button and Mac Mail will now attempt to detect the incoming server settings
***Note: If the test isn’t successful, click Continue again. You can verify your settings after you complete this procedure.
5. Enter the following information:
-
Description—Enter the name of your ISP (e.g: monroeaccess.net):
-
Outgoing Mail Server—mail.monroeaccess.net
-
✔ the Use only this server box.
-
✔ the Use Authentication box.
-
User Name—Enter your entire email address (e.g., myname@monroeaccess.net) .
-
Password—Enter the password for your email account.
6. Click the Continue button and Mac Mail will now attempt to detect the outgoing server settings. If the Outgoing Mail Security window appears, do the following:
-
DO NOT Check the Use Secure Sockets Layer (SSL) box.
-
In the Authentication drop-down menu, select Password.
7. Click the Continue button
***Note: If the test isn’t successful, click Continue again. You can verify your settings after you complete this procedure.
8. When the setup process is done, you will see an Account Summary window that summarizes your connections. Click the Create button.
**NOTE: Check the account summary for any errors, click take accounts online, and click create.
If Mail doesn’t connect, you might need to verify that Mail is set up to send and receive mail using the security and port settings
1. In Mail, click Mail > Preferences >Accounts.
2. On the Accounts tab, select the account you want, and then click Advanced.
3. On the Advanced tab:
-
Ensure Use SSL is NOT selected.
-
Make sure the Port is 143
-
Make sure the Authentication is Password.
-
Make sure the Domain Name text box is empty
4. On the Account Information tab:
-
Under Outgoing Mail Server (SMTP), make sure Use only this server is selected.
-
Under Server port, make sure Use Secure Sockets Layer (SSL) is NOT selected
-
Make sure the Server port is 587
-
Under Authentication, verify that Password is selected, and then click OK
- Microsoft Outlook 2013
1. Open Outlook and select File
2. Click the Add Account button
3. Click Manual setup or additional server types, then click next
4. Click POP or IMAP, then click Next
5. Enter the following information:
USER INFORMATION
-
Your Name: Type the name that you would like for recipients of your emails to see
-
Email Address: Enter your entire email address (e.g., myname@monroeaccess.net)
SERVER INFORMATION
LOGON INFORMATION
-
Username: Enter your entire email address (e.g. myname@monroeaccess.net)
-
Password: Enter the password for your email account
-
Place a check ✔ in remember password checkbox if you do not want to type your password each time you want to receive email.
6. Click the Outgoing Server tab
7. Click the Advanced tab, Enter the following information:
-
Incoming server (IMAP): 143
-
Use the following type of encrypted connection: NONE
-
Outgoing Server (SMTP): 587
-
Use the following type of encrypted connection: NONE
Click OK, Click Next
8. Click Close
9. Click Finish
- Microsoft Outlook Express
1. Open Outlook Express and click Tools on the top menu
2. Click Accounts in the drop down menu
3. Click the Mail tab at the top of the Internet Accounts pop menu
4. On the right side of the window, click Add and click Mail
5. You will now see an Internet Connection Wizard with Your Name at the top. There is an open field to type a Display Name. Type the name that you would like for recipients of your emails to see. Click Next
6. You will now see an open field to type Email Address. In the Email Address field, type your complete email address in all lowercase letters (ex: myname@monroeaccess.net). Click Next.
7. You will now see the Email Server Names Screen. Select IMAP from the drop down menu at the top that asks you to select what type of incoming mail server you have.
8. Enter the following server information:
Click Next
9. Next screen will ask for the Internet Mail logon information. In the Account Name Field type the your full email address (e.g: myname@monroeaccess.net). In the Password Field, type the password you were given. Place a check in remember password checkbox if you do not want to type your password each time you want to receive email.
10. Do not place a check in the log on using secure password authentication check box. Click Next.
11. You will see the Congratulations screen. Your email account setup is now complete. Click Finish
12. You are almost done. Return to Tools -> Accounts ->Mail. Select the respective account and click Properties ->Servers -> Under Outgoing Mail Server place a Check in the box next to My outgoing server (SMTP) requires authentication.
13. Click More Settings –>Outgoing Mail Server -> select My outgoing server (SMTP) requires authentication -> choose Use same settings as my incoming mail server, click OK
13. Click Advanced Tab and enter the following information:
**DO NOT select SSL for either port
14. Click OK
- Mozilla Thunderbird
1. Open Thunderbird Mail Client
2. Select the Tools tab.
3. Select Account Settings
4. Add the following:
5. Click Server Settings
Add the following:
-
Server name: mail.monroeaccess.net
-
Port: 143
-
User Name: Access Account UserID (e.g. myname)
-
Security Settings: None
-
Authentication method: Normal Password
7. Click Outgoing Server.
Add the following:
-
Server Name: mail.monroeaccess.net
-
Port: 587
-
Connection security: None
-
Authentication method: Normal Password
-
UserName: Email Address (e.g: myname@monroeaccess.net)
8. Click Ok.
9. Click Ok.
- Windows 8 Mail
1. Select the Windows Button to switch to the start screen, then launch the Mail app.
2. Move your mouse to the bottom right hand corner of your screen, which will bring up the Charms Bar. Then click on the “Settings” Charm 
3. From the Settings Menu, click “Accounts”
4. Click the “Add an Account” link
5. Click “Other Account”
6. Enter the E-mail Address and E-mail Password provided by your ISP (monroeaccess.net) and click “Show More Details”
7. Enter the IMAP email server settings as provided and click “Connect”
-
Incoming (IMAP) email server: mail.monroeaccess.net
-
Incoming Port #: 143
-
Outgoing (IMAP) email server: mail.monroeaccess.net
-
Outgoing Port #: 587
-
✔ Outgoing Server requires authentication
-
✔ Use the same username and password to send and receive email
8. Click “Connect”
- Windows Live
1. If this is the first time that you have used Windows Live Mail, the Add an E-mail Account wizard will start automatically. If you already have an email account in Windows Live Mail, click the Add e-mail account link.
2. Enter the the following information:
-
E-mail Address: Enter your entire email address (e.g., myname@monroeaccess.net).
-
Password: Enter the password for your email account.
-
Display Name: Enter your first and last name. This is the name that will appear in the From field of messages you send.
Click the Next
3. Enter the following information:
-
My incoming mail server is a: IMAP
-
Incoming Server: mail.monroeaccess.net
-
DO NOT Select the This server requires a secure connection (SSL) check box.
-
Port – 143
-
Login ID—Enter your entire email address (e.g., myname@monroeaccess.net).
-
Outgoing Server: mail.monroeaccess.net
-
Port – 587
-
DO NOT Select the This server requires a secure connection (SSL) check box
-
Select the My outgoing server requires authentication check box
4. Click Next
5. Click the Finish
- Windows Mail
1. Open Windows Mail. It will prompt you for your Name. Enter whatever name you would like to display on all outbound email messages. Click “Next” to continue
2. Now, enter in your email address. This will be the email provided by monroeaccess.net (ex: myname@monroeaccess.net). Click “Next” to continue
3. Now, enter the email server settings as follows:
Incoming Mail Server Type: IMAP
Incoming Mail Server: mail.monroeaccess.net
Outgoing Mail Server: mail.monroeaccess.net
Place a ✔ next to “Outgoing server requires authentication”
Click “Next” to continue
4. Enter the account which is the information listed before the @ symbol in your email address. Enter the e-mail password assigned to this email account. Click “Next” to continue
5. Your Windows Mail Account has been setup. Click “Finish” to complete setup.
Place a ✔ next to “Do not download my e-mail at this time”
6. Access Email Settings to configure additional IMAP Settings. After clicking “Finish”. The Windows Mail application should open. If not, Open Windows Mail. At the top, click “Accounts” and Select “Tools” from the drop down menu
7. Select the email account listed under Mail and click Properties
8. On the Properties screen, Click the “Servers” tab. Ensure all information is accurate on this screen. Ensure there is a ✔ next to “Remember Password” and “My Server Requires Authentication” Only. Click “Apply”.
9. At the top, click the “Advanced” tab to display more settings. On this Screen change the settings as follows:
Incoming Port #: 143
Outgoing Port # : 587
Click “Apply”
10. Click ‘OK” and then “Close”.